Showing posts with label tips and trick. Show all posts

In camera photographs photography tips and trick

A New Camera? Get the Most Out of It

A feeling that many new camera owners frequently experience is that the pictures they take 'do not look as good as I had anticipated... '

The simple solution to this problem is to get to know your camera properly. Modern digital cameras are technological marvels - even the lowest priced 'point & shoot' and they can help you to take delightful images that you really enjoy. But...


Most people go straight to the "Quick Start" leaflet, make sure they know some of the crucial buttons to press, ignore the instruction manual and begin taking pictures. 'Real women and real men do not read instruction manuals!'

This is all well and good but you will never get to appreciate the technological wonder that you now possess and you will absolutely not get full value from your purchase. Your instruction manual is the most important accessory possible for your camera and it's free!

The key point is that your instruction manual is not a book to be read from cover to cover - that way lies confusion - 'there is just so much to learn!' It is a reference manual! For ease of reference download it as a PDF file - both to your desktop and to your smart phone. This gives you easy and fast access to both the menu and to whatever subject you need. You would normally use your desktop but the smart phone as a reference can be really useful in the field.

An old proverb:
'I hear and I forget'

'I see and I remember'

'I do and I understand!'

There are any number of courses that you can take to help you get to know your camera. The major brands offer them as a free service if you buy a camera above a certain level. The courses are given by people who really know the camera and they take you through everything it will do in a relatively short time. Many owners come out of the course slightly bewildered thinking 'what a complex camera - I will never understand or be able to do all of that!'

'I do and I understand!'

This is the key phrase. Anything that you teach yourself is far more likely to be remembered than anything you have been shown.

So, using your manual, you gradually build up your knowledge of your camera. Learning functions and techniques as you need to use them rather than trying to learn everything at once. Everything will gradually become second nature to you - remembering that practice does make perfect!

By using the PDF format everything is full screen and easy to read and follow. You also have two hands to hold your camera and experiment with the various buttons.

The various diagrams in the manual refer you to different sections for extra detail. Every lever and button on your camera is explained in clear, easy to follow language.

Use your manual and teach yourself all about your camera as you progress along your photographic journey and you will reap full benefit from your technological wonder.

This will cover all the practical aspects of using your camera - along the way you will have to develop your own approach to the challenging fun of composition etc!

Enjoy your Camera!

Read More

Share Tweet Pin It +1

0 Comments

In beach photos photograph photographer photographs tips and trick

How to Take Good Beach Photos

When you play at the beach, you must want to take some good pictures to keep the happy moments. When the sexy bikini is showing your charming figure, the wide beach hat is highlighting your elegant temperament and the sunglasses is featuring your mysterious smile, you are happy like a baby. But most importantly, you are having fun with your loved family or friends. So undoubtedly, you want to keep such beautiful memories in mind for a longer time. There is another easy way: taking wonderful pictures. However, not everyone is good at making all kinds of nice poses in front of the camera. Don't worry, this article will suggest some very simple but really nice poses to you.


Recommendation 1: You can ask your traveling companion who is holding the camera to capture your turning around moment with a big smile and looking straight at the camera. Capturing the exactly turning moment is the key to make this pose successful, which requires privity between you and the photographer.

Recommendation 2: Back facing the camera, you can fondle your hair with your left hand and take your large brim hat with the right hand. Your should face towards the direction of the wind at beach, so your hair and brim hat will sway like dancing along with the wind. What a beautiful moment that would be!

Recommendation 3:
When the sunshine become soft at dusk, you can capture the scene when the sun is sitting in the horizon of the sea. Stand on your toes and ask your partner to squat, with the sunset ornament your body, you would become part of the beautiful sight.

Recommendation 4: You can make a good use of the sands. Sands can be the easiest tool for taking beach photos. Actually it can be very useful for many poses. Today I recommend you this simple one: just fiddle up the sands and shoot the exact moment when they are spreading down, PS with a nostalgic grounding color, your eyes won't want to leave such a picture in the photo albums.

Recommendation 5:
You can also lie down at the beach to let your companion take the photo from your head side. With both of your hands at the wide brim beach hat and kneels stay higher than your head, you can make a lovely photo pose. The hat is better being white, the same color with the clouds, or blue, the same color with the sky and the sea.

Read More

Share Tweet Pin It +1

0 Comments

In photography tips and trick

Is White Balance Important in Digital Photography?

Camera owners often ask about 'White Balance' and the part it plays in digital photography. Is it important and can they perhaps use it to improve their photography.
Well, the colour of the light reflected from an object varies with the colour of the light source. The brain adapts to all these changes so that white objects appear as white objects whether seen in the shade, direct sunlight or under incandescent lights. Unlike film cameras, digital cameras can mimic this adjustment by processing images according to the colour of the light source.

With 'automatic' white balance the camera identifies the brightest element in the picture, assumes this is white and then adjusts or balances all the colours in the picture based on this.

Most of us just leave the White Balance setting on 'automatic' and the camera does a pretty good job of estimating the correct setting and we are generally happy with the results.

However, if we really want to improve our photography and add our own individual touches to our images it is really well worth experimenting with the various white balance settings available on your camera - AWB (automatic) Cloudy, Daylight (Bright Sun) Shade, Tungsten etc - and seeing the difference they can make to your pictures. Remember, you know what the prevailing light is. Your camera can only guess!

If you experiment with these, you will soon be able to see how to make the best use of them to help your photography. For example, if you use the 'cloudy' setting, even when it is not cloudy, it will have the effect of 'warming up' the picture - great for sunsets! The automatic setting may well remove most of that wonderful glow you wanted to capture.

The wonder of Digital Photography is that you can experiment freely at no cost - play around and experiment with your camera to your heart's content - the more familiar you become the better you will get at taking pictures that actually reflect what you have seen and which are not just 'postcard clones' as it were!

Continual experimentation is one of the key secrets of digital photography. It can take people some time to get out of the habits of film photography where it cost money each time you pressed the shutter button! Once again - time spent reading the instruction manual for your camera will pay serious dividends in helping you to really enjoy your photography!

Read More

Share Tweet Pin It +1

0 Comments

In photographer photographs photography tips and trick wedding photography

What a Photographer Should Not Miss in a Wedding

A Wedding is the most important day for any couple. That is the day when two people become one and look forward to living their whole life together. Sometimes couples spend years and all their life savings planning for this big day so we can understand how critical it is to get everything right on this occasion.

An essential part of any wedding is photography. Some weddings also have videography but even though you might find a wedding with just a photographer, you will rarely find one with just a videographer. It is imperative that the photographer hired to document this holy union understands the responsibility of their job.

Marriage is not just a union of two people but also two families. Even though the stars of the wedding day are the couple, what makes a wedding memorable is the presence of friends and family. As a wedding photographer, you might think all your shots should be of the couple but you risk missing some great moments of other people.

Yes, by all means get a lot of shots of the couple. Do their portraits, candids, etc but if you have a second shooter, tell him/her to keep an eye out on the guests and take photos of them too. A second shooter might be duplicating the same shots that you are taking and there is a reason second shooters do that. They want to use these shots in their portfolio and the only money shots according to them are of the couple so it is up to you to tell them firmly what you want.

Few years down the line or even a few decades later, when the couple, their children or grand children look at the wedding photos, they will not be thrilled to see five hundred photos of just the bride and groom in five hundred different poses but what will bring lot of smiles and a lot more of happiness is to see photos of their friends and family who all came together for that day. Those kind of memories are priceless. Would a couple rather just show their children or grand children just those amazing shots of them or would they want to talk and show their friends and family who might not be around anymore and who were not part of the group family shots? I am not saying that beautiful portraits and moments of the couple are not important, they definitely are but at the same time, don't lose sight of other people in the wedding. When I am photographing a ceremony or a dance, I tell my second shooter to once in a while turn around towards the crowd and shoot the reactions, while I take care of the ceremony. You will be surprised with what you will get. Some priceless emotions.

Few years down the line or even a few decades later, when the couple, their children or grand children look at the wedding photos, they will not be thrilled to see five hundred photos of just the bride and groom in five hundred different poses but what will bring lot of smiles and a lot more of happiness is to see photos of their friends and family who all came together for that day.

Read More

Share Tweet Pin It +1

0 Comments

In photography tips and trick wedding photography

7 Wedding Photography Tips

Learning the art of wedding photography takes some time and practice. Given below are some tips that can help you take photos at a wedding. If followed properly, these tips will help you take your desired shots. This will also help you grow as a professional. Read on.

1. Create a list of places

Make sure the couple knows about the type of shots they want to be taken on the big day. Ideally, you may want to make a list. This is important as far as taking family photos is concerned. Don't forget to take the shots that you think are the most important to the couple.

2. Find the Location

You may want to check out the place where you are going to shoot the photos before the wedding day. This will give you a pretty good idea of some good positions for photos. These will be the positions where you will get enough light.

3. Preparation is important

Since many things can go wrong on the wedding day, we suggest that you stay prepared. You may have to create a backup plan and get the batteries fully charged. If possible, you may want to be present at the ceremony place. This is the place where you can get important information regarding some good position for the shots.

4. Set expectations

Let them know your style. What you need to do is find out the purpose they want to achieve. Moreover, you may want to find out the number of photos they want you to take. In addition, you should not forget to agree on the photography service charges.

5. Consider the details

You may want to take photos of the shoes, rings, dresses, table settings, flowers and menus, just to name a few. This will give an extra dimension to the album. Moreover, you may want to check out some wedding magazines in order to get inspiration.

6. Use Two Cameras

Having two cameras is important. If you don't have more than one camera, we suggest that you borrow or hire one. Make sure you have multiple lenses at your disposal. It's a good idea to use a longer lens and a wider lens. If you have the budget, make sure you buy another camera for better performance.

7. Shoot in RAW

Like most people, you may dislike shooting in RAW since this takes more time. However, keep in mind that on a wedding, shooting in raw can be very useful. Since you may have to shoot in poor light, we suggest that you shoot in raw. While editing, RAW images won't lose too much details.

So, if you have been struggling as a photographer, we suggest that you follow the tips given in this article, especially if you are going to shoot photographs at an upcoming wedding. Remember: you can't be a good photographer unless you spend a good deal of time, effort and money into the art. With practice, you will become a skilled photographer. Hope this helps.

Read More

Share Tweet Pin It +1

0 Comments

In adobe lightroom camera photographer tips and trick

Tips For Editing Camera Raw Files In Adobe Lightroom

Using raw image files

Raw images carry unprocessed details that can be further developed into a great photograph. The regular jpeg images that you click using a camera is automatically enhanced depending on the maker of the camera. The raw images are untouched by the automated settings of a camera.


The camera raw file format changes with the brand and model number of the camera. The commonly used camera raw format is the Digital Negative or DNG format.

Lightroom supports import of different types of raw files. The iOS version of Lightroom also offers editing of certain raw images which can be opened in the desktop version for further enhancements.

12 Tips to develop your raw images beautifully

Import your raw image in the Lightroom workspace and follow these tips as per the required results:

1. Adding white balance

When you click on white balance option, there is a pop-up list of white balance options such as daylight, cloudy, tungsten and more. You can use one of the options to fix the white balance of your raw image or try better options from the list.

2. Color and Tone Correction

Adjust the color balance in photographs. Clarity, vibrance, hue, saturation, tone curve etc. are some of the Lightroom options to correct the color and tone of the images. The vibrance slider is used to control saturation but it does not oversaturate skin colors.

3. Correct the exposure

The raw image may be overexposed or underexposed. Use the exposure slider to increase or decrease the exposure values.

4. Enhance the details

Use the fill tool to bring back the missing detail in the image which is present in the raw file.

The amount of brightness captured by the raw image is much more than a regular jpeg image. Adjust the values in the highlights slider to recover the details from a raw image in Lightroom.

5. Vignette effect

Lightroom has a post crop vignetting feature which can be used to add effects to a cropped image.

If you have a lot of highlights in your image then choose the Highlight Priority effect. Choose the Color Priority effect to preserve color hues in your raw image. Select the Paint Overlay option to blend black and white colors with original colors of your raw image.

6. Grain effect

Add a film grain style to your raw images to create grain effect. For revealing a part of the image, add the grain effect to rest of the image area with a higher value as grain amount. You can control the size, amount, and roughness of the grain. For a blurred image, increase the size of the grain particle to more than 25%.

7. Dehaze effect

There are times when weather conditions can lead to a hazy image with smoke or fog. To fix the haziness or adjust it, use the dehaze effect. Once you have made the required changes to the photograph by adjusting the color, brightness etc., go and select the "Dehaze" options in the effects panel.

8. Radial Filter

To focus on people or objects in an image, you can use the radial filter. After you select the radial filter from the toolbar, you need to select an area of focus. The filter gives you the choice to apply the modification inside or outside the circle drawn by you.

While working on projects for photo retouching services, you can add more radial filters on the images to bring multiple objects into focus.

9. Paint with the Adjustment brush

Lightroom gives you the freedom to paint the local adjustments such as brightness, tint, saturation, clarity and more. This alternative lets you paint adjustments in parts of the images as per your choice.

Similar results can be achieved with the Graduated Filter tool.

10. Retouching

Professionals widely use the retouching features of Lightroom to deliver high-quality photo retouching. You can remove blemishes, adjust brightness and make a lot of adjustments to retouch photos.

Here is one quick tip; before starting to retouch portraits, tick "Profile corrections" and "Remove chromatic aberration" in the basic tab under the lens corrections tab to fix distortions captured by the camera lens.

11. Save presets

You can save the changes that you make using the Adjustment Brush tool or the Graduated Filter tool as a preset. Use the "New Local Correction Setting" to save the adjustment presets and use it again while working with raw images. These presets can be useful while working on color correction of similar images.

12. Add Camera Raw

You can use the Camera Raw plugin with Lightroom to correct distorted perspectives and do more. Camera Raw is another raw image processor from Adobe and has similar photo editing functions.

Read More

Share Tweet Pin It +1

0 Comments

In beginners photography tips and trick

9 Setting Recommendations For New DSLR / Mirrorless Cameras

So you just bought a "serious" camera, whether it's a DSLR or Mirrorless camera, for the first time. The most fun is directly used. But then you see. That is available and start to confuse what with your new camera settings.

In this article, we will discuss and manage some basic DSLR / Mirrorless camera settings that will make it easier for you.

1. Memory Card

Go to the camera main menu, then search for format commands. In Nikon D5500 for example, you go to Menu >> Setup Menu >> Format. While in Fuji X-E2 and push Menu OK >> slide down in Setup Menu 3 >> Format.

2. Determine the Image Size and Quality

Because your camera is now quite "serious", it's good to make the best possible to produce images with the best quality available. Use the highest quality JPEG format (Extra Fine or Highest Quality) with Large file size. 


If interested in the RAW format that stores more photo information, you can also use it. Make sure you understand the difference between the image files with JPEG vs RAW format. When using RAW format, make sure your computer has enough software and specifications to read and convert RAW to standard format.

3. ISO

The ISO setting in the camera determines how much light money the camera needs to produce photos.

High ISOs such as the 6400 are useful when you shoot in a place with dim light but are at risk of producing photos with spots / noise. While a low ISO such as 100 or 200 produces images without clearer noise and with the best quality but make the photo vulnerable when you shoot blur indoors.
 

For the initial stage of use, the best ISO setting you can choose is Auto.

4. White Balance

The camera's white balance setting affects the color accuracy of the photos. As discussed in this article on white balance, skin color or color of the shirt may seem strange when the camera uses a white balance that does not fit.

Fortunately, today's cameras are so sophisticated that they rarely miss. Use the auto white balance setting as a prefix while experimenting with other white balance settings.


5. Metering

Metering settings determine how the camera measures the reflected light of the object then how they produce a combination of shutter speed and lens aperture that matches the measurement results.In the early stages of using your new DSLR / Mirrorless camera, use the Evaluative (Canon) metering mode or Matrix (Nikon). As the addition of flying hours with your camera, start using other metering modes according to the shooting conditions and objects that you photograph: center weighted, spot and others.Metering mode options can be understood in more detail in Understanding DSLR Camera Metering Modes.

6. Focus

The lens in the camera you use can automatically find focus by utilizing the camera's autofocus system or manually by rotating the focus ring on the lens.In this early stage, take advantage of the camera's autofocus (AF) system and use Single AF mode (One Shot AF or Single Area AF). In this mode, the lens will lock the focus at one point you have specified when you press the shutter button halfway. Use the midpoint of focus and start practicing so that your hand is frisky to change the focal point. 


Other AF mode options such as AI-Servo or AF-C can be used when you are shooting a child who keeps running. Discussion about autofocus mode you can read here.

7. Drive Mode

The camera mode drive determines the speed of the camera in taking exposure. Single Shot mode is suitable for most shooting conditions and everyday photo objects. Set the camera in this mode when you first use it. In this mode, whenever we squeeze the shutter button, the camera will make a photo.Another mode available is Continuous Mode, useful when shooting moving objects. The camera will continue to make photos as soon as we press the shutter button full, the mode of telling the senior photographers. There is also a Delay or Remote mode that can be used in other conditions. Read more about Drive Mode in this article.

8. Exposure mode

There are two fairly friendly modes for the new camera owner: Auto Mode, Scene and Program Mode. In both modes, the camera determines all or most of the camera settings so you can focus on taking pictures.Unfortunately when the camera is in both modes, many parameters are turned off the camera. On the first day, you can use one of the 3 modes.Next, start using Aperture Priority and Shutter Priority. And please also start experimenting with Manual mode. Re-read about Camera Exposure Mode.

9. How to Make Sharp Photo Result?

One of the most questions that go into the contact page is why the resulting photo remains blur, not sharp. Make sure you read 20 Tricks for Photo Sharp and know 5 Photo Cause Why Photo Not Sharp.  

Read More

Share Tweet Pin It +1

0 Comments

In photography tips and trick

How Digital SLR Camera Metering Works (DSLR)


Every modern digital SLR camera from its factory is equipped with technology called Metering Mode, Exposure Metering, Camera Metering or for more practical we call Metering that has been assembled therein. In this article we will try to understand what is metering? How it works as well as some major weaknesses that we have to face (underexposed & overexposed). In the next article, we further understand about metering mode (matrix / evaluative, center weighted & spot metering).

What is Metering? What is the point?

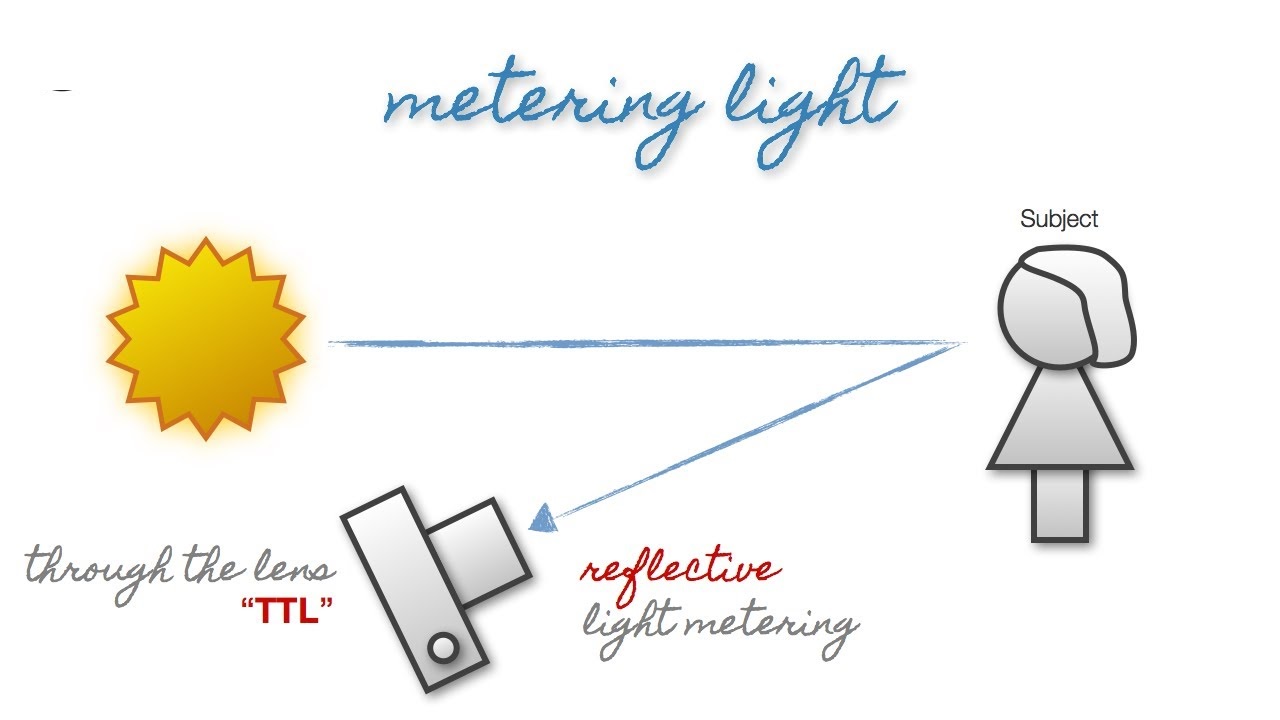
In principle, it is not unlike the roll meter used by the construction worker or the tape measure used by the tailor to measure the length, only this metering is used by DSLR cameras to measure light, which is relatively more subtle than measuring the length.Metering is used to measure the light seen by the camera (light coming into the lens). When we look at a photo object through the camera viewfinder, the light conditions in the object will be measured by the metering system. The main purpose of the camera metering system is to produce a photo that fits its exposure (read again concept exposure). Metering does this by analyzing the light darkness of a photograph object and then determining the amount of shutter speed, aperture and ISO so that the results of your photo fit, not too dark or not too bright.Hmm his dizziness .... Okay, so like this. Imagine your eyes. When you feel the glare of what you do? Squinting eyes instead! You unconsciously reduce the amount of light coming into your eyes so you do not glare (not too bright). Conversely, when you feel the light is too dim you automatically open your eyes wide. Squint your eyes or open your eyes wide so your eyes feel comfortable when you see (the right exposure), that's the job of camera metering system.

 How Camera Metering System Works & Weaknesses

When the camera sees the wall, the metering system will measure the amount of light (the darkness of the light) reflected by the wall (reflective). This is easy when all photo objects reflect the same amount of light.Fuss, in real world each object has a different level of reflection. When we take pictures of the sky, if the sky is perfectly blue the camera's metering will be easy to calculate exposure because there is only one bright level to calculate (blue). But when we shoot the sky with the addition of white clouds, metering must now discourage bright blue sky and bright white clouds and should strive to produce optimal exposure. Now add mountains and rows of trees into the photo object above, then the level of complexity metering gets complicated.How do the camera metering system designers anticipate this situation? The answer is to try to make the average light dark level of an object of any photo. Technically the average light dark for the camera metering system is 18% gray (18% gray or normal gray) - not too dark and not too bright - see photo below. A photo object with a reflection level of light that has a bright, complex darkness will be "domesticated" in this way.18% -abu-grayThis solution in general can indeed be used to take pictures of normal conditions. But when we are faced with the conditions for example you will photograph the face of friends with a perfect white background, the camera will make your friend's face darker because it should anticipate the white background and bring it towards the 18% gray aka underexposed. Or for example when you take a photo of a flower inside a small glass glass placed on a black tablecloth, the flower photo will be brighter than the original because it must bring the black tablecloth to 18% gray alias overexposed.

Then We Should How?

Just as we can not continuously use auto exposure, to produce great photos we can not use the camera metering system without some tricks (leave it in the default position). To be more clear, please read some metering modes that can help us anticipate the weakness of this metering system.

Read More

Share Tweet Pin It +1

0 Comments

In photography tips and trick

Exposure Mode In DSLR and Mirrorless Cameras

In any digital camera, whether a DSLR camera, a mirrorless camera or a sophisticated (rather sophisticated) pocket camera, there is always a wheel on the top of the camera where we can choose the camera operation mode: And they always have at least the following options: Auto, P, S (Tv), A (Av), M and Scene. You can see the camera mode wheel in this photo example:


 Note that Nikon and Sony use S and A notation, while Canon and Pentax use Tv and Av, both are the same but only different notations.This code is an abbreviation: Auto for Auto, P for Program Mode, S or Tv for Shutter Priority Mode, A or Av for Aperture Priority Mode, M for Manual Mode and Scene for automatic mode adjusted with object type option to be in photo.Let's take a look at the code and the camera mode options above for more details:

Auto mode

Auto mode is usually marked with a green camera icon, accompanied by the letter A. In this mode, the camera will attempt to analyze the object we are photographing and then define all camera settings. If there is a term point and shoot (shoot and then snap) without having to complicate change anything, this auto mode is meant.Looks fun is not it? Unfortunately the image in this mode can be said not maximal. In auto mode, the camera will determine the size of ISO, Shutter Speed, Aperture using the computer workflow determined by the camera manufacturer based on the light conditions when we press the shutter half (metering).When we shoot in a slightly complicated light, when sunset for example, the camera will be quite confused and then produce a photo that does not describe the sunset we want. Anyway, with you already buy a DSLR / Mirrorless camera that is more expensive than a tiny pocket camera or smartphone, continuous shooting using the auto mode it feels really so redundant.Overall, Auto Mode is eligible for the following conditions:
  •     When we are too hasty, the important moment of his dapet, camera settings do not trigger
  •     When you are really beginner, do not understand about the concept of exposure
In the latest generation of cameras, also available Intelligent Auto mode, this is the auto mode with the addition of features such as face detection, i-Contrast (Canon) or D-Lighting (Nikon). There is also a name Creative Auto where we can change the sharp space. If your camera is equipped with this, use the auto intelligent auto / creative mode compared to the usual auto mode, at least there will be an increase in the image.Keep in mind that while in auto mode, many options and camera settings will be turned off by the camera to make it easier for him to work.

Scene Mode

Scene mode is a choice of mode where we choose the type of object or certain scenes that we will photograph. Suppose we want to photograph a friend: turn the wheel mode to Scene position and then we select Portrait. In Scene Mode, the camera is equipped with camera settings commonly used in typical shooting situations.

Here are some types of situations provided in scene mode:
  • Portrait: the camera will automatically narrow the sharp space (dpeth of field) so that the background becomes blur and make the model face more prominent (plus settings for skin tone and softening for smoother skin look).
  • Landscape: when we take a scene, the camera will use a large sharp space so that the object near the lens to the farthest look sharp. Green and blue colors will also be more highlighted
  • Macro (Close Up): when you want to capture a flower from close range or want to take a bowl of meatball before eating.
  • Sports: used when we take pictures of fast-moving objects. The camera will move to the focus method that tracks the movement of the object.
  • Night Portrait: used when we want to photograph the face at night. Flash will automatically turn on
  • Sunset / Sunrise: explain enough, used when we want to shoot sunset or sunrise
  • Fireworks: to shoot fireworks using a very slow shutter speed
  • Beach / Snow: the camera will compensate to avoid under-exposed photos as it measures the white background
  • Some other scene mode options depend on camera type and brand


Program Mode (F)


While in Program Mode (P) the camera will automatically determine the size of the shutter speed and aperture settings. Even so, we can change the combination of aperture or shutter speed.
 

gambar
The camera will try to balance between the shutter and the aperture, if we aim the lens to a bright area, the aperture number automatically enlarges while the shutter speed is maintained at a fairly fast rate. Point the camera to the dark area and the aperture numbers will shrink to keep the shutter from blurry.

The way to change the settings the camera has selected is to rotate the camera control wheel. If we turn the dial to the left then the camera will be "forced" to slow the shutter speed and increase the aperture. If you dial the dial to the right, the camera will be "forced" to speed up the shutter speed and minimize the aperture.

Program mode in more detail is also discussed in this article.

Shutter Speed Priority Mode (S or Tv)

In shutter priority mode, we manually set the shutter speed and the camera automatically selects the aperture value based on the amount of light entering through the lens.

This mode we can use when the shutter speed is the most critical setting: for example when will freeze the movement of objects that move quickly (need a very high shutter speed) or if we deliberately want to create a photo blur (need a low shutter speed). Similarly, when we want to use photo panning techniques as below, moving to the shutter mode priosity will greatly facilitate the work:...

When panning with 1/10 second time, the shutter priority mode is used   

If there is too much light, then the aperture number will enlarge (narrow lens openings) so that the amount of light entering the lens will decrease. If too little light enters the lens then the aperture number will decrease (enlarged lens openings) so that more light into the lens.So in shutter priority mode, the shutter speed value will be constant unchanged according to our settings, while the aperture value will vary depending on the amount of light. Also read: 6 Creative Speed ​​Shutter Techniques Landscape Photography.

Aperture Priority Mode (A or Av)

In aperture priority mode, we define the aperture setting manually and the camera determines the size of the shutter speed according to the amount of light entering the lens. Using this mode, we have full control over the depth of field, because we can lower or raise the lens aperture and let the camera count the shutter speed.Using aperture priority mode is a safe way to use the camera because the risk of photo under-exposed (dark) or over-exposed (too light) is quite small. Why? Because the value of its range camera shutter is quite wide: from 30 seconds to 1/4000 seconds (or 1/8000 seconds on a particular camera), and the range of such numbers is wide enough for a variety of light shooting situations. 

For a front puddle to look as sharp as the end of the bridge on the far side, aperture priority is used and set in f / 14 

About aperture priority mode, please read the article that discusses more here.

Manual Mode (M)

As the name implies, we determine the camera aperture and shutter speed manually completely. The camera will only do light measurements and make recommendations via metering scale, but will not do anything other than that.This mode can be used when photographing a photo object whose lighting conditions make the camera "confused". An example is when we photographing friends on the beach is very bright, the camera may misjudge exposure so that the face of friends so black so the sand on the beach is not over-exposed. In this condition, we can use manual mode, metering with spot metering by measuring exposure on the face of friends and then determine the aperture and shutter speed manually based on the results metering earlier. The result is a photo that is more concerned about the face of friends and subordinate the beach.Manual mode is also useful when for example we photographed panorama, in order to happen consistency. Panoramic photos are generated from some stitched photos, and the aperture and shutter speed values ​​should always be consistent so that the end result of the panoramic photo will be consistent, not the dappled, dark and bright. Another example of use is shooting sessions using a variety of flash (flash) in the studio that will be difficult to measure by camera metering and requires a separate lightmeter.To change after shutter speed and aperture, when you use a camera that has only one control wheel (command dial), turning the control will change only one: aperture or shutter speed. Other settings are changed by rotating the control wheel while pressing the exposure compensation button.Bulb Mode (B)Bulb mode is one of the special settings of the camera, where we can use the shutter speed above 30 seconds, even we can use the shutter speed as long as we want. Maximum shutter speed range on the DSLR / mirrorless camera when using other modes will stuck at 30 seconds, well with this bulb mode we can use the shutter speed far exceeded this figure.The word bulb appears because in ancient times, our grandparents who became photographers use a bubble of wind in a rubber (bulb) that suppresses the shutter mechanism so it opens. 

Bulb mode is required to create photos with this 120 second exposure time. 

What is bulb mode, how to use and examples of its use are discussed in this article.

Note :

These are the types of modes we can choose for different shooting conditions and skill levels. No one will make fun of you because more often using auto mode, but auto mode will limit the creative power that can be achieved with your camera. Accustomed to using auto or Scene, try turning to A or Av, aperture priority, and staying there all day. The majority of professional photographers spend more than 75% of their camera settings in aperture priority mode. Worth a try, and you will be amazed by your own skills. 

Read More

Share Tweet Pin It +1

0 Comments

In photography tips and trick

Camera Settings - Drive Mode: Single, Continuous, Remote and Timer

One of the requests or questions most readers say is about setting / camera settings. About which button does what to produce what kind of photos. Well belfot will try to describe it one by one. This time about Drive Mode.Before going too far, I want to limit this article to DSLR cameras, mirrors and pocket cameras that support manual settings. In the pro camera, a dedicated button is usually available for almost all basic setting functions. While in beginner camera, because the number of buttons is limited so as not to be confusing, the photographer must go into the menu and change the camera settings from there.Ok, back about Drive Mode. Drive mode is one of the basic camera settings. Each mode is available to give the photographer an option when photographing the subject type and specific shooting conditions (will be explained later).The majority of cameras have at least 3 drive mode settings: Single, Continuous and Continuous High (super fast). But generally also provides options such as timer 2 seconds and 10 seconds and others.

How to change drive mode in camera

You can change drive mode in different ways depending on the type and brand of camera you use. Example how to change drive mode from menu like this:


 Or if your camera has a button or a control wheel, you can change it by rotating this wheel:


While in the mirrorless camera, drive mode is available like this:


Drive Mode: Single Shot

Single SHot is the default choice for all cameras, so when you start the camera for the first time after purchasing it, the drive mode option will be in Single Shot. Single Shot Mode Drive option can be used for shooting situation mayotitas: when shooting landscape, photographing stylish girlfriend, photographing food before uploading to Instagram, photographing used cameras to be sold, photographing friends posing at kopdar event etc. In essence, Single Shot is used when you take pictures in ordinary conditions: objects that do not move or pose, The advantage of shooting in Single Shot mode is? We do not have to worry about most taking photos because for every once shutter button is fully depressed, only one photo is generated, as opposed to the continuous mode drive as below.

Drive Mode: Continuous / Burst  


In the Continuous or Brust drive mode options, the camera will still shoot and take photos continuously as long as we press the shutter button. With this mechanism, we will be very helpful when we have to take pictures of moving subjects quickly: children who run without clear direction, photographing futsal games etc., where we want to get a series of photos in a fast sequence. Our task will be to choose which photo is considered the best and will be used because it now has dozens, even hundreds of photos resulted from this mode drive.

Some cameras have further options in this drive mode: Continuous High (H) and Continuous Low (L), super high speed and low speed.

Low: In Low Continuous, the camera will take photos in a streak at a low speed. This option is given when we are photographing a moderately moving subject and we do not want to run out of memory cards in no time. Example: photographing a sack race.


High: When shooting fast-paced actions and subjects, this option will take advantage of the camera's ability to snap the fastest streak of photos. If the camera specification is capable of shooting 12 frames per second in JPEG format, then while in Continuous High, the camera will attempt to generate 12 JPEG images when we press the shutter button in 1 second without removing it (influenced many things: card speed, focal speed etc. ). Example of use: photographing karapan sapi or sprint sprint race.

Drive Mode: Self-Timer


The Self Timer mode gives the pause time between when the shutter button is pressed and when the camera takes a photo, there will usually be 2 pause time options: 2 seconds or 10 seconds. Drive mode is useful when we have no friends but want to take pictures, just put the camera on a tripod then use the Self Timer mode 10 seconds and run to the front of the camera. Self Timer is also useful when you shoot long exposure with a shutter speed above 1 second and do not want to hand to shake the shutter button makes the camera shake and cause the photo is not sharp.

Drive Mode: Remote

In this mode drive, the function of the shutter button will be taken over by the remote control (remote control), both using wired or wireless. This mode is used by many landscape photographers who use the remote to produce super sharp photos by installing the camera on a tripod and never directly touch the shutter button to reduce vibration.
Dive Mode: Silent or Quiet


Drive mode is useful when we have to take pictures in a place that demands a quiet atmosphere: sacred religious events etc. In this mode, DSLR cameras will move the mirror box more slowly so as not to make a loud noise but the speed of taking photos is reduced. The mirrorless mirrorless camera will leave a mechanical shutter and then use an electronic shutter mechanism to produce a quieter sound in this Silent model.

Drive Mode: Mirror Lock Up

Drive Mirror Lock-Up mode is only available in DSLR cameras. In this mode, the mirror box will be locked in an open position so that no more mirror box swings just before taking a picture. Before activating Mirror Lock-Up mode, make sure the focal point and composition of the photos you have compiled in the viewfinder. Mirror Lock-Up is often used landscape photographer to reduce camera shake so that the resulting image sharper.Some Tips Using Drive Mode

Check Drive Mode camera before taking a picture

Sounds trivial but many have forgotten to make sure in what mode drive the current camera before you start playing jeprat-snap. It's shame if it turns out the camera is in the position of Self Timer or Remote, but your friend is busy monyongin lip waiting photographed ..Use Continuous Drive Combination Mode and Continuous AFWhen shooting a moving subject and we use Continuous drive mode, use Continuous AF focus mode (more about camera focus mode) when camera is over locked focus in single AF mode, so the camera will track the subject position and possibly get photo with subject The sharp becomes bigger.Use Remote or Self-Timer or Mirror Lock-Up when shooting long exposureWhen shooting with a shutter speed above 5 seconds and using a tripod, the self timer / remote / mirror lock-up drive mode will greatly help us get very sharp images when enlarging 100% photos because with this mode the camera will be solid not moving the same once.     

Read More

Share Tweet Pin It +1

0 Comments